
What is the best tape to use for painting? The protective tape or masking tape is a product that stands out in construction and painting work. That is because of its rubber adhesive, which allows easy removal without leaving marks on the paint.
The paper tape serves to delimit the painting areas, and cover all the edges of the floors and walls that we want to paint. With a correct application, the tape will not lift or leave sticky marks on any surface.
In this article, we will discuss 3 Best Painter’s Tapes, and how to use the masking tape step by step, and obtain a neat finish.
What Is the Best Tape to Use for Painting – 3 Best Painter’s Tapes
Curly paper or crepe tape: made of paper and with natural rubber adhesive. You should use it in interiors to apply on surfaces that you don’t want to paint.
Crepe masking tape with low adhesion: unlike the previous one, its adhesive sticks less. This type is ideal for painters who do not want to run the risk of tearing off the paint when removing the tape.
Outdoor tape: as it has an acrylic adhesive, it is resistant to sun and rain. It is best for application outdoors or surfaces. You can easily recognize it by its blue color.
As a last tip, don’t forget to remove the masking tape when you complete your painting project. You can use the spatula to mark the edges of the tape with the surface.
If any stains remain because a spot has been left on the floor, you can wipe the surface with a cloth. Then, scrape it off with the spatula and sand it again.
How to Use the Best Tape for Painting
-
Having the Right Tape for Painting
The first step is to have the right tape to start the work. Painters’ tape or masking tape is the ideal product for this task. Other paper tapes may be ideal for masking outdoors, or at different temperatures while maintaining their functionality.
However, we must check that we have the right tape for the conditions of the environment where we are going to work. Remember using a tape with the wrong adhesive could tear off pieces of paint, delaying all the work.
-
Prepare the Surfaces
You should place the masking tape on dry, and dust-free surfaces. Storing the furniture in another space outside the work area is the main option. On the other hand, if there is no other place to store it, we can place it towards the center of the room. This way, we will leave the walls and spaces free for taping.
Using plastic or cardboard wrapping to cover floors and furniture that we do not want to paint is also essential during preparation and covering of the environment. We do not recommend you to use newspaper or fine fabrics, as this could cause the paint to stain.
With a damp cloth, we can wash the walls to remove dust before applying the tape.
The adhesive tape will also serve at this point to bring together the elements that will protect the surfaces. Therefore, will have a stable environment that will allow us to work more safely.
-
Vacuuming and Sanding the Floor
If we need to paint the floor, it is necessary to vacuum it completely to remove dust and any residue before masking.
Using an eccentric sander is one of the best ways to achieve a professional finish. Furthermore, making movements in the same direction of the wood grain will obtain a more precise sanding.
Once you sand the surface, you must vacuum it again before masking.
-
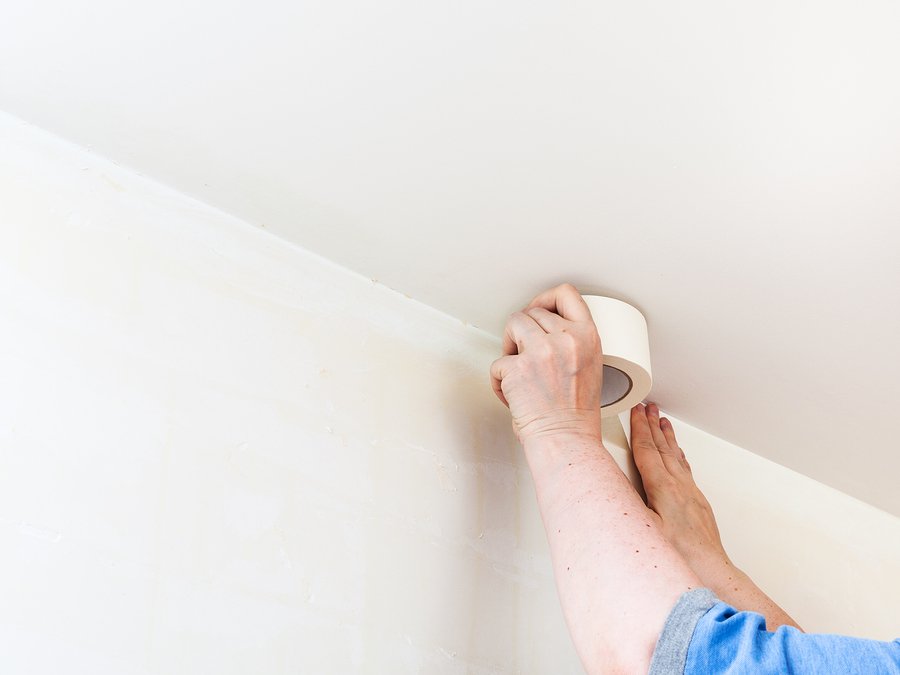
Masking Floors and Walls
If you need to paint the walls, you will need to tape the edges of the floor to prevent paint from falling on them.
We can start taping at a junction point between the wall and the floor, thus covering all the surfaces where we are going to paint.
It is advisable to start by painting the frames. Once you finish painting them, tape them up to protect them when working on the walls or floors around them. With one hand, we can glue the tape, and with the other hand, we will extract it from the roll.
Moreover, you should also tape locks, doors, windows, and other objects that you want to protect.
Cutting and gluing strips that do not exceed 50 cm in length will give us more control when placing them on the surface.
To obtain greater precision, we can go over the line of the tape with a spatula. It will enable you to affirm the adhesion to the floor or wall and eliminate air bubbles that surface imperfections cause.
Remember that stretching this type of tape could cause it to break, while peeling it off to accommodate it would decrease its adhesive strength.
-
Masking Other Elements
It is important to take advantage of the tape to cover other devices. They include electrical plugs, switches, electronic devices, and other elements that protrude from the surface where we are going to work.
If the area has cracks and other work is necessary before painting, it is still good to cover the most vulnerable elements with tape. Once you cover the cracks and sand the surface, we can clean the area again to remove any residue. Then, you can now apply the adhesive tape that will delimit the area you will paint.
-
Use Different Ribbons to Paint
Having tapes of different sizes gives us more practicality when applying it. Using thinner tapes, depending on the surface you want to mask, will give us greater precision in lines and angles of reduced space.
A tape of about 3 centimeters wide will be very useful for most of the works.
Conclusion – Best Tape for Painting
The adhesive tape is an indispensable tool for masking floors and walls. Perfecting its use and application will save us time, guaranteeing the correct protection of the surface we need to cover.